Eco-Friendly Guide: How To Make Biodegradable Plant Pots
Looking for an eco-friendly way to grow your plants? Say goodbye to plastic pots and hello to biodegradable plant pots! Making your biodegradable plant pots is not only a simple and fun DIY project, but it’s also a sustainable solution that helps reduce waste.
In this article, we’ll show you how to make biodegradable plant pots using common household items. Whether you’re a seasoned gardener or just starting, this step-by-step guide will walk you through the process of creating environmentally friendly pots for your beloved plants.
Let’s get started on this exciting journey of learning how to make biodegradable plant pots that are both good for your plants and the planet!

How to Make Biodegradable Plant Pots
Biodegradable plant pots are eco-friendly alternatives to plastic pots. They are made from naturally decomposing organic materials, reducing waste and environmental impact.
This guide will teach you how to make biodegradable plant pots using various materials and techniques.
Whether you’re a gardening enthusiast or a beginner interested in a sustainable DIY project, this article has all the information you need to create your own biodegradable plant pots.
Materials Needed:
Before we dive into the process, let’s gather all the materials you’ll need to make biodegradable plant pots:
- Newspaper or cardboard
- Water
- Flour
- Salt
- Mixing bowl
- Measuring cup and spoons
- Muffin tins or other molds
- Plastic wrap or wax paper
- Rubber bands
- Decorative materials (optional)
Making Plant Pot Paper Pulp:
To create the biodegradable plant pots, we’ll start by making paper pulp from newspaper or cardboard. Follow these steps:
- Tear the newspaper or cardboard into small pieces.
- Place the torn pieces in a large container and cover them with water. Let it soak for at least 24 hours.
- After soaking, transfer the mixture to a blender or food processor. Blend until you achieve a smooth, paste-like consistency.
- Pour the pulp into a mixing bowl and add water to thin it out. Aim for a consistency similar to pancake batter.
Creating the Plant Pot Mixture:
Now that you have the paper pulp ready, it’s time to prepare the mixture that will hold the pot together. Follow these steps:
- In a separate mixing bowl, combine 1 cup of flour with 1/4 cup of salt.
- Add the paper pulp gradually to the flour and salt mixture. Stir well until all the ingredients are thoroughly combined.
- You can add small amounts of water if the mixture is too thick. The consistency should be similar to a thick pancake batter.
Shaping the Biodegradable Plant Pots:
Now that you have the plant pot mixture ready, it’s time to shape them into pots. Follow these steps:
- Prepare your molds by greasing them or lining them with plastic wrap or wax paper to prevent sticking.
- Place the molds onto a flat surface.
- Fill each mold with the plant pot mixture, ensuring it is evenly distributed.
- Smooth out the top surface of the pots using a spatula or your fingers.
- Optional: You can add decorative materials, such as pressed flowers or leaves, to the surface of the pots at this stage.
Drying and Curing the Plant Pots:
After shaping the plant pots, they need to be dried and cured before use. Follow these steps:
- Place the filled molds in a well-ventilated area with good air circulation.
- Allow the pots to air dry for at least 24 hours or until they are completely dry to the touch.
- Once dry, carefully remove the pots from the molds.
- Place the pots back in the drying area to cure for an additional 2-3 days. This process allows the pots to harden and become more durable.
Planting in Biodegradable Pots:
Now that your biodegradable plant pots are ready, you can use them to plant your favorite seedlings or small plants. Follow these steps:
- Fill the pots with a suitable potting mix for your plants.
- Make a hole in the center of the potting mix for the seedling.
- Place the seedlings gently in the hole and cover the roots with soil.
- Water the plant pot thoroughly, ensuring the soil is evenly moist.
- Monitor the moisture level of the pot regularly and water as needed.
Benefits of Biodegradable Plant Pots:
Using biodegradable plant pots offers several benefits for both the environment and your plants. Some of these advantages include:
- Reduced plastic waste: By using biodegradable materials, you contribute to reducing the amount of plastic waste that ends up in landfills and oceans.
- Improved plant health: Biodegradable pots allow for better air circulation and moisture retention, promoting healthier root growth and reducing the risk of root-bound plants.
- Convenience in transplantation: When it’s time to transplant your seedlings or plants, you can directly plant the biodegradable pot in the ground, minimizing root disturbance and transplant shock.
- Nutrient-rich compost: As the biodegradable pots break down, they contribute organic matter to the soil, enhancing its fertility and promoting a sustainable gardening ecosystem.
Disposing of Biodegradable Plant Pots:
When your plant has outgrown its biodegradable pot, you may wonder how to dispose of it properly. Follow these guidelines for responsible disposal:
- Check if your local municipal composting facility accepts biodegradable plant pots. If they do, you can simply add the pots to your compost bin or green waste collection.
- If composting is not an option, bury the pot in your garden, ensuring it is covered with soil. Over time, it will naturally decompose.
- Avoid disposing of biodegradable pots in regular plastic or trash bins, as they may not break down in landfill conditions.
Tips for Successful Biodegradable Pot Making:
To ensure successful results when making biodegradable plant pots, consider the following tips:
- Experiment with different paper pulps, such as newspaper, cardboard, or even shredded leaves, to find the mixture that works best for your needs.
- Avoid adding too much water to the paper pulp, as this can affect the consistency and strength of the pots.
- Ensure the pots are completely dry before attempting to remove them from the molds, as premature removal can cause them to deform or break.
- Store the dried pots in a cool, dry place to prevent moisture absorption and potential mold growth.
- Consider adding natural dyes or paints made from plants to give your pots a personalized touch.
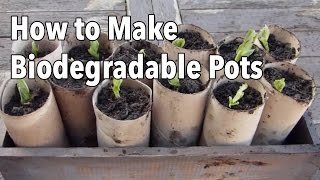
Homemade Biodegradable Pots
Faqs for How To Make Biodegradable Plant Pots:
Biodegradable plant pots can be made from a variety of materials such as coconut coir, peat moss, wood pulp, paper, and even bioplastics derived from renewable sources like cornstarch or sugarcane. These materials are eco-friendly and will naturally break down over time, minimizing environmental impact.
To make biodegradable plant pots using coconut coir, you can mix it with organic binders such as starch or natural gums to improve its structural integrity.
Use a mold, like the bottom of a plastic bottle or a small container, to shape the pots. Fill the mold with the coconut coir mixture, compact it, and allow it to dry.
Once dry, remove the mold, and you’ll have your biodegradable plant pots ready to use.
Absolutely! Biodegradable plant pots can be made from recycled materials such as old newspapers, cardboard, or shredded paper.
You can create a mixture of recycled paper and water, allowing it to soak and become a pulp.
Shape the pulp into pots using a mold and let them air dry. These environmentally friendly pots are perfect for starting seeds or planting small plants.
Using biodegradable plant pots has several benefits. Firstly, they are better for the environment as they break down naturally and reduce plastic waste.
Secondly, when transplanting seedlings, you can plant the entire pot directly into the soil, minimizing transplant shock.
Additionally, these pots provide good drainage and aeration for healthy root growth. Lastly, biodegradable plant pots promote sustainability and a greener gardening approach.
The time it takes for biodegradable plant pots to break down depends on the materials used and the environmental conditions.
Typically, it can range from a few weeks to a few months. Pots made from coconut coir, peat moss, or wood pulp tend to break down faster compared to bioplastics.
However, proper moisture and temperature levels can accelerate the decomposition process.
Yes, you can use biodegradable plant pots for outdoor gardening. They are suitable for various outdoor plants, herbs, vegetables, and flowers.
However, it’s important to consider the specific material of the pot and its durability against outdoor elements.
Some biodegradable pots may degrade more rapidly when exposed to moisture, so ensure they are appropriately watered and protected from excessive rainfall if needed.
Final Thoughts
Making biodegradable plant pots is an easy and sustainable way to help the environment. Use materials like newspapers, egg cartons, or biodegradable substances such as rice husks and coconut fibers to create eco-friendly pots that will naturally break down.
These pots provide a safe environment for plants to grow and eliminate the use of plastic pots that can harm the environment. So, when you start gardening, try making biodegradable plant pots for a greener future.